> ## Documentation Index
> Fetch the complete documentation index at: https://docs.gumstack.com/llms.txt
> Use this file to discover all available pages before exploring further.
# Quickstart
> Create and deploy your first MCP server in Gumstack
In this guide, you'll create and deploy your first MCP (Model Context Protocol) server using Gumstack. By the end, you'll have a working server with a custom tool that AI assistants like Claude, Cursor, and others can use, all deployed and ready in minutes.
## Prerequisites
Before you start building, make sure you have:
* **GitHub connected** in [Settings](/platform/settings). Gumstack needs this to create and manage your server's repository.
* **GitHub App installed** for automatic deployments on push.
* **Python 3.10+** and [uv](https://docs.astral.sh/uv/) (recommended) or pip installed locally.
If you haven't connected GitHub yet, head to [Settings](/platform/settings) first.
## Create your server
Go to [Internal MCPs](https://gumloop.com/gumstack/servers/internal) and click **Create New Server**. This opens a full-screen wizard that walks you through setup.
Give your server a name and description. Select your GitHub organization and a repository name. Gumstack validates the repository name in real-time to ensure it's available.
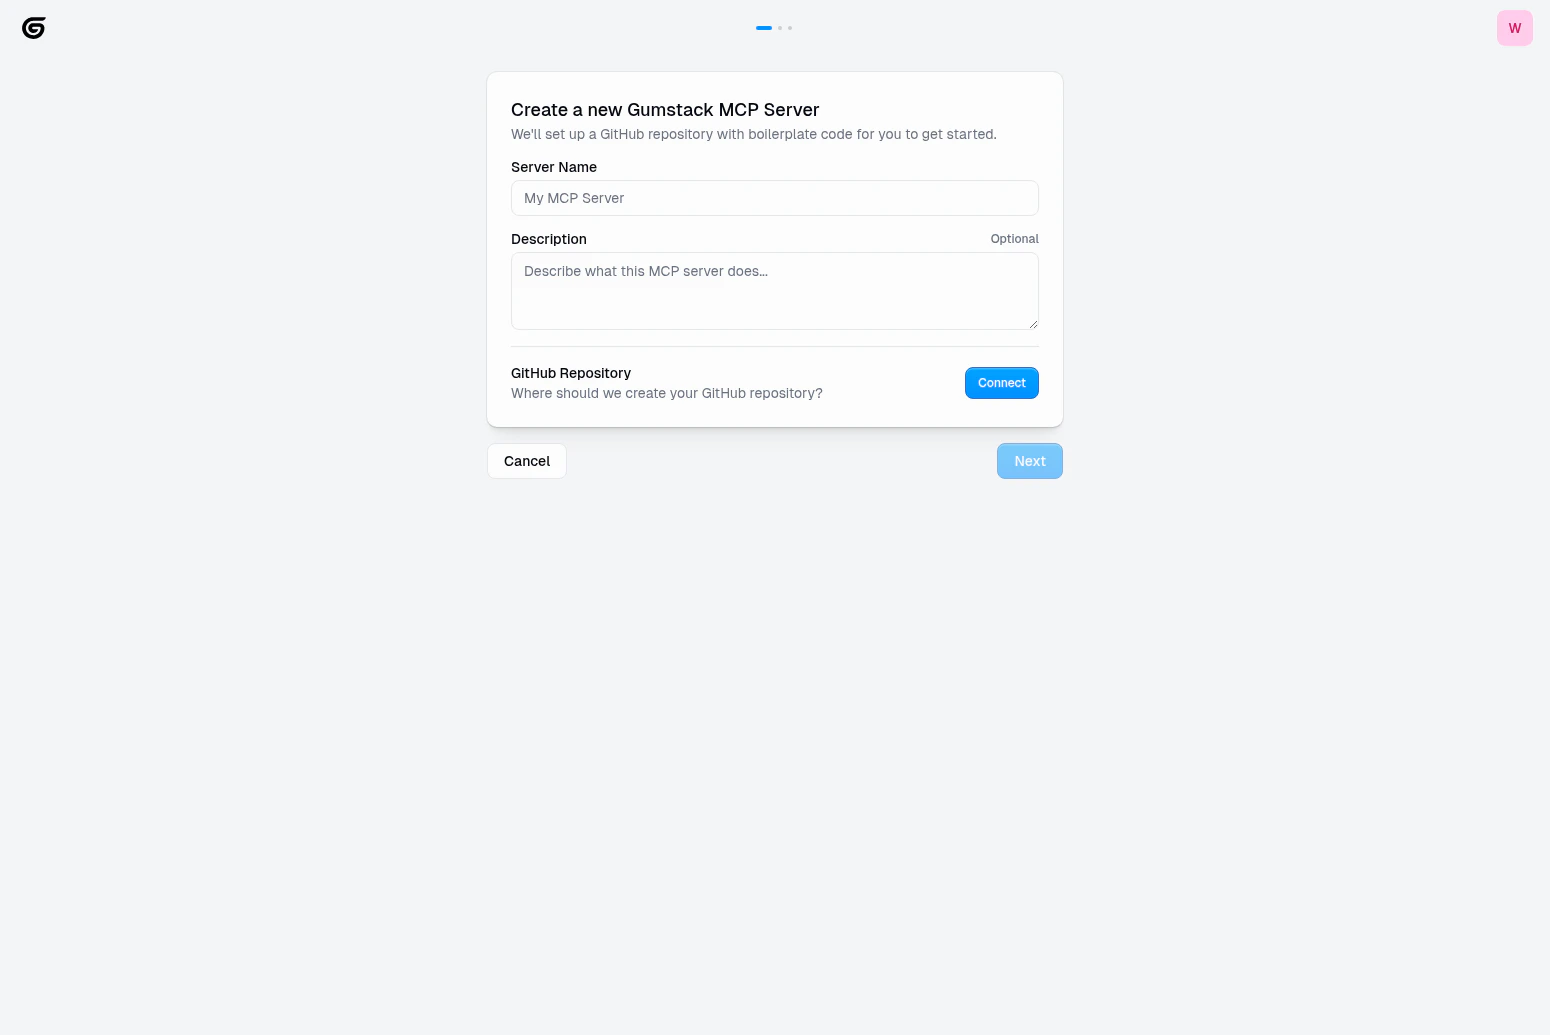 | Field | Description |
| -------------------- | -------------------------------------------- |
| **Server name** | Display name shown in the Gumstack dashboard |
| **Description** | Brief explanation of what the server does |
| **GitHub Owner/Org** | Which GitHub org to create the repo in |
| **Repository Name** | Must be unique, alphanumeric with `-_.` |
| **Visibility** | Public, private, or internal |
Choose how users will authenticate with your server. This determines how your MCP server accesses external services on behalf of users.
| Field | Description |
| -------------------- | -------------------------------------------- |
| **Server name** | Display name shown in the Gumstack dashboard |
| **Description** | Brief explanation of what the server does |
| **GitHub Owner/Org** | Which GitHub org to create the repo in |
| **Repository Name** | Must be unique, alphanumeric with `-_.` |
| **Visibility** | Public, private, or internal |
Choose how users will authenticate with your server. This determines how your MCP server accesses external services on behalf of users.
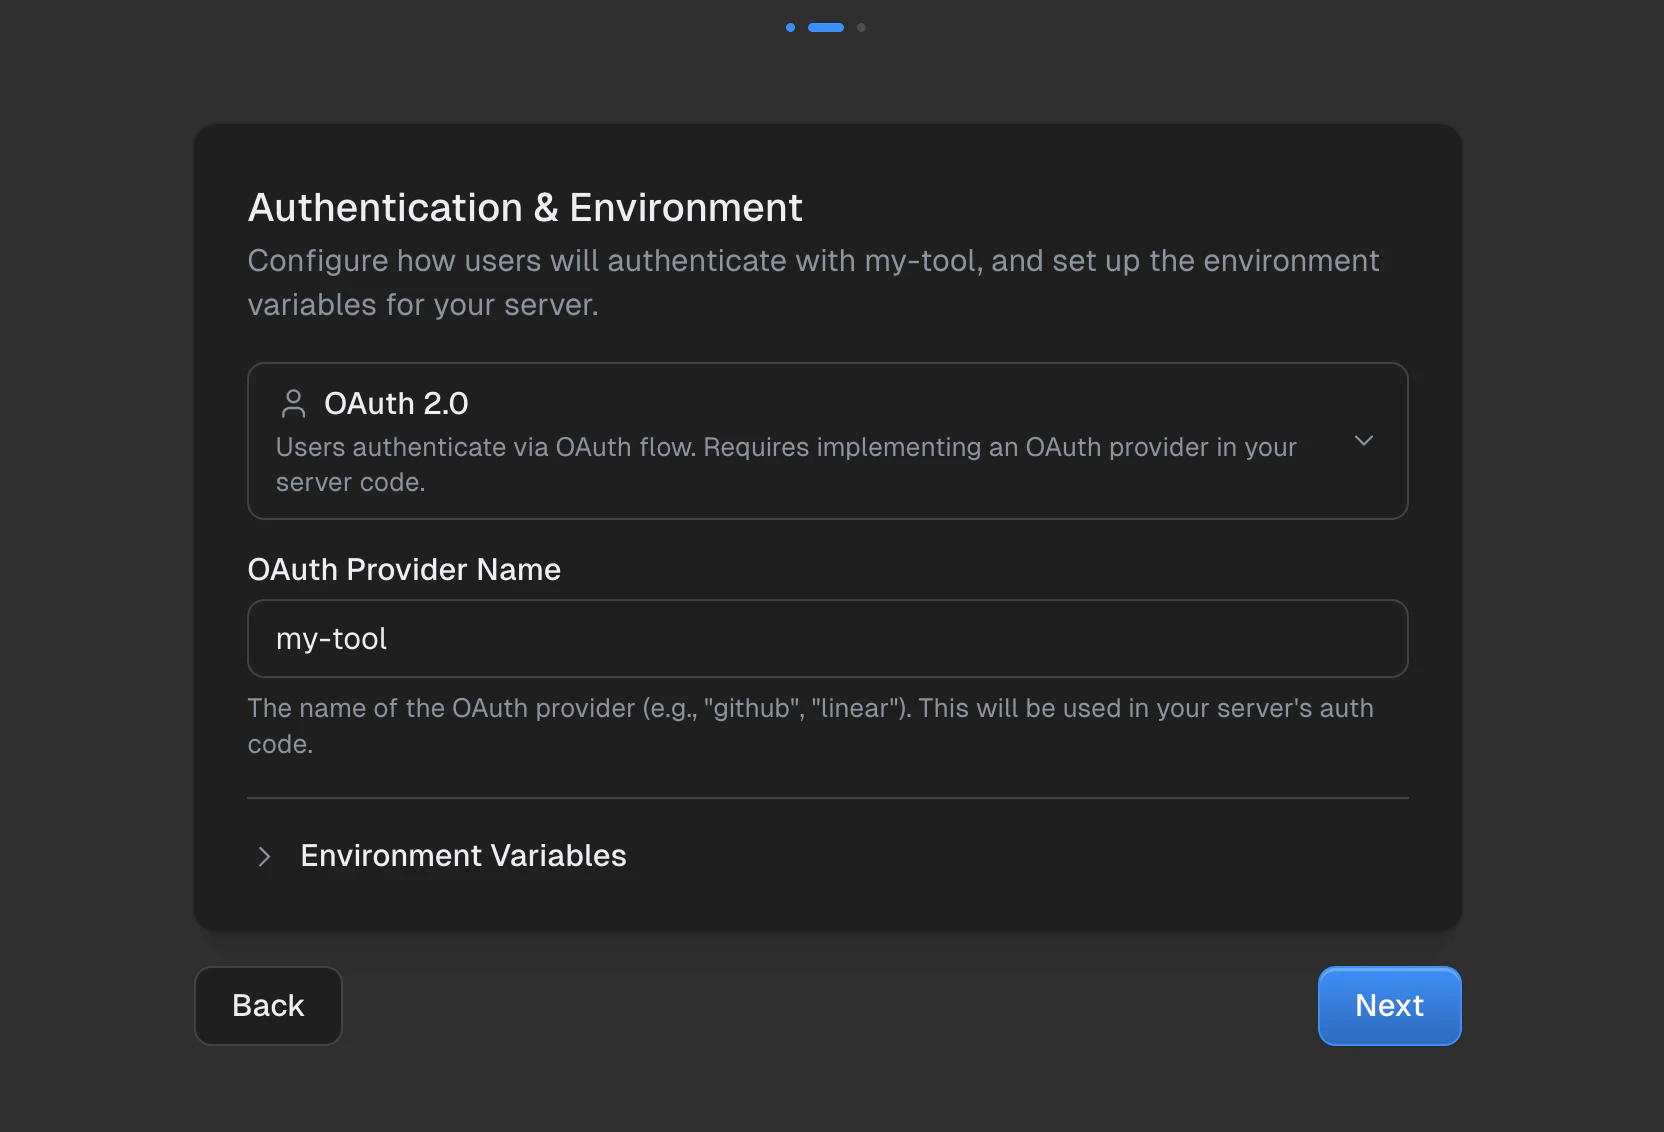 | Auth Type | Use when |
| ------------------------- | ------------------------------------------------------------ |
| **OAuth 2.0** | Users authorize via OAuth flow (Linear, GitHub, Slack, etc.) |
| **API Key / Credentials** | Users enter their own API keys in the Gumstack UI |
| **No Authentication** | You provide shared keys via environment variables |
You can also add **environment variables** for any secrets your server needs at runtime (e.g., `CLIENT_SECRET`, `API_BASE_URL`).
Double-check your configuration. Each section has an **Edit** button to jump back and make changes. Click **Create** to generate everything.
| Auth Type | Use when |
| ------------------------- | ------------------------------------------------------------ |
| **OAuth 2.0** | Users authorize via OAuth flow (Linear, GitHub, Slack, etc.) |
| **API Key / Credentials** | Users enter their own API keys in the Gumstack UI |
| **No Authentication** | You provide shared keys via environment variables |
You can also add **environment variables** for any secrets your server needs at runtime (e.g., `CLIENT_SECRET`, `API_BASE_URL`).
Double-check your configuration. Each section has an **Edit** button to jump back and make changes. Click **Create** to generate everything.
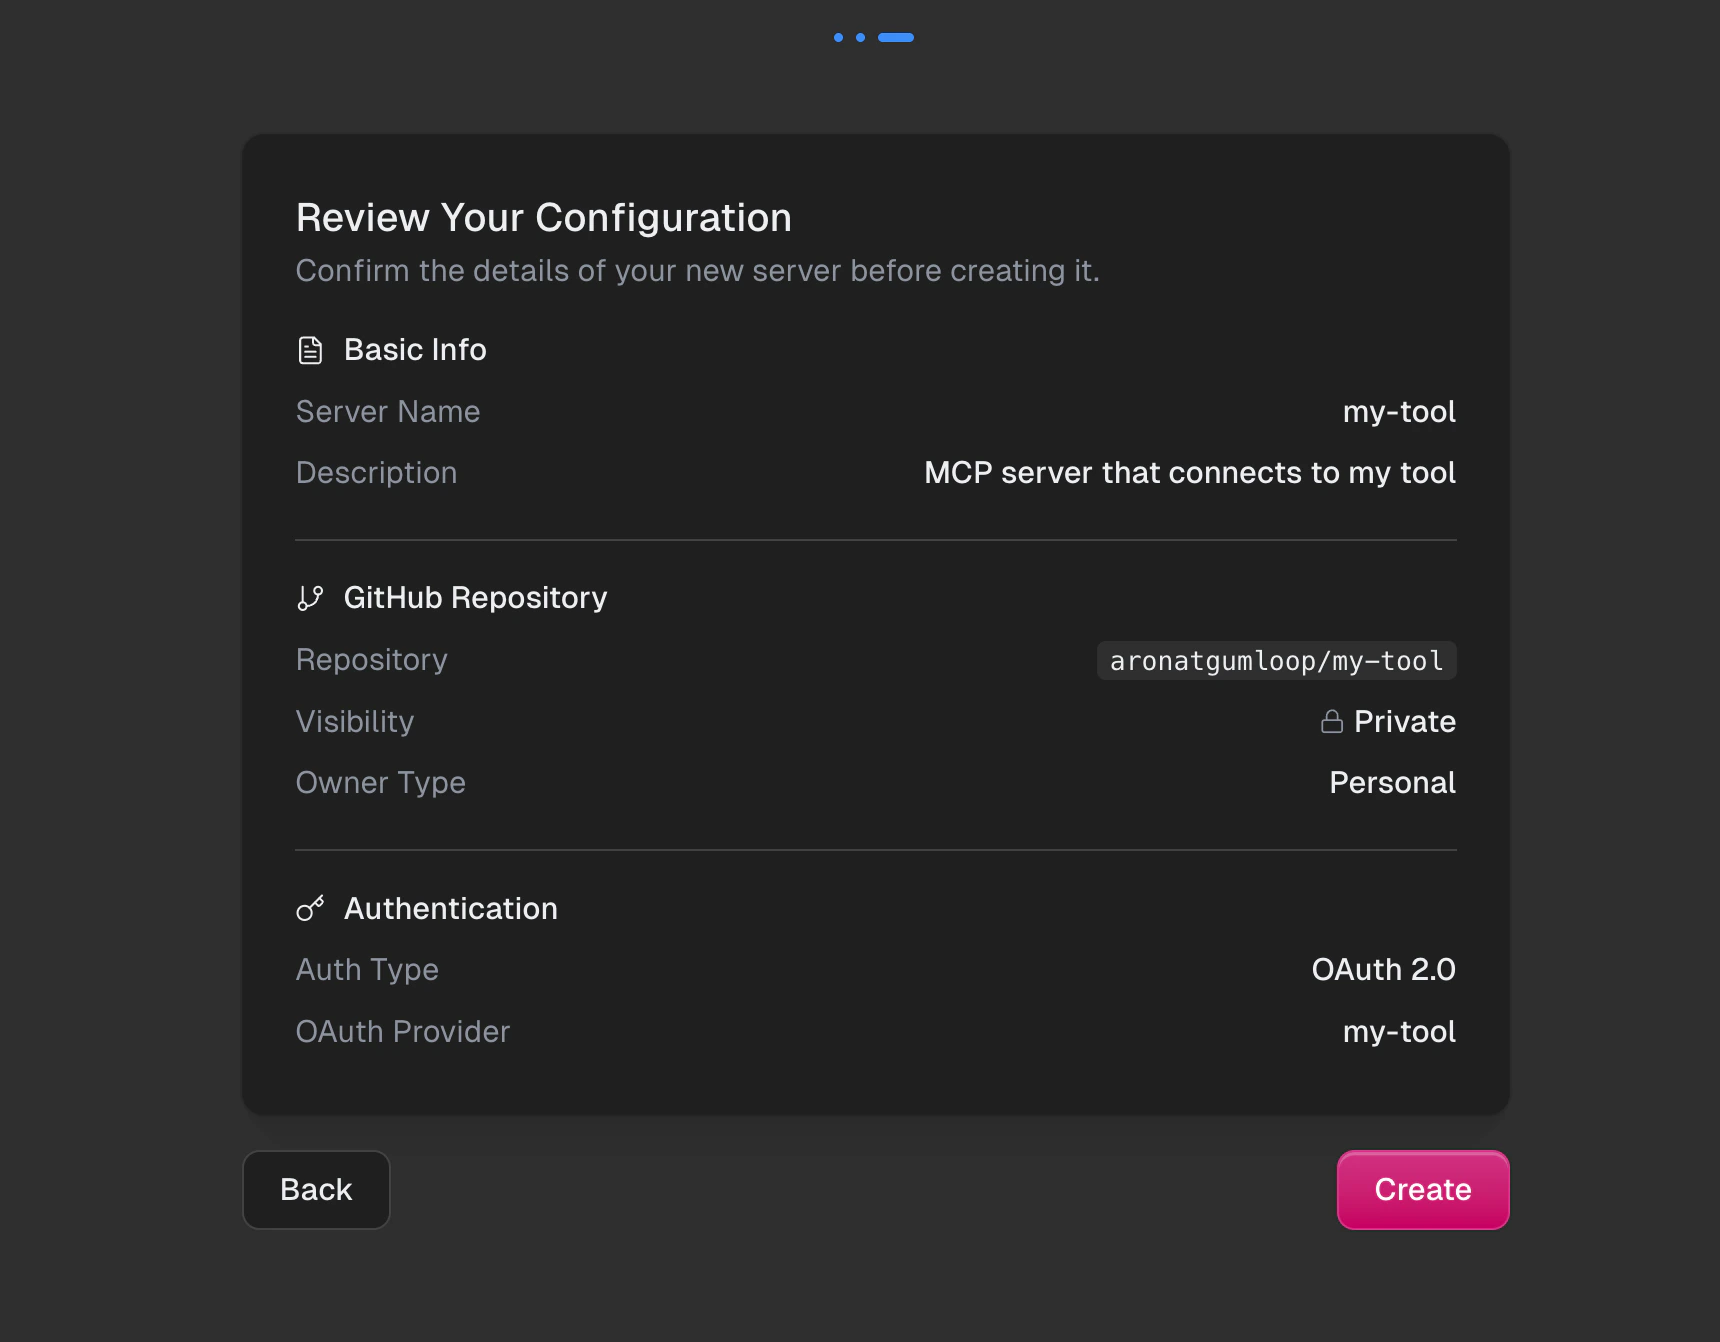 Gumstack will:
1. Create a GitHub repository with the full project template
2. Set up the CI/CD deployment pipeline
3. Configure authentication based on your selection
If the Gumloop GitHub App isn't installed on your new repository, you'll see a prompt to install it. This enables automatic deployments when you push code.
You can skip this and set it up later in [Settings](/platform/settings), but deployments won't be automatic until it's installed.
## Clone and install
Clone the repository Gumstack created and install dependencies.
```bash theme={"dark"}
git clone https://github.com/your-org/your-server.git
cd your-server
```
We recommend [uv](https://docs.astral.sh/uv/) for fast, reliable Python package management.
```bash theme={"dark"}
uv sync
```
Using pip with a virtual environment:
```bash theme={"dark"}
python -m venv .venv
source .venv/bin/activate # On Windows: .venv\Scripts\activate
pip install -e .
```
## Add your first tool
Tools are the functions your MCP server exposes to AI assistants. Each tool has a name, description, and logic that the AI can invoke.
Edit `src/server.py`:
```python theme={"dark"}
from mcp.server.fastmcp import FastMCP
from pydantic import BaseModel
mcp = FastMCP("my-server")
class GreetingResponse(BaseModel):
message: str
@mcp.tool()
def greet(name: str) -> GreetingResponse:
"""Say hello to someone."""
return GreetingResponse(message=f"Hello, {name}!")
```
Register your tool in `config.yaml` so Gumstack knows to expose it:
```yaml theme={"dark"}
tools:
- name: "greet"
description: "Say hello to someone"
```
Every tool needs both a Python function **and** a `config.yaml` entry. Without the config entry, Gumstack won't detect the tool. See [Tools](/building/tools) for best practices.
## Deploy
Push your code to trigger an automatic deployment:
```bash theme={"dark"}
git add .
git commit -m "Add greet tool"
git push
```
Gumstack watches your repository and automatically builds and deploys your server whenever you push to `main`. You can monitor the deployment from the **Deployments** tab on your server's detail page.
Your server is live! You can find its URL on the server's **Overview** tab in [Internal MCPs](/platform/internal-servers).
## What's next?
Understand your server's file layout
Learn tool best practices and patterns
Implement OAuth, credentials, or env vars
Connect your server to Gumloop workflows
Gumstack will:
1. Create a GitHub repository with the full project template
2. Set up the CI/CD deployment pipeline
3. Configure authentication based on your selection
If the Gumloop GitHub App isn't installed on your new repository, you'll see a prompt to install it. This enables automatic deployments when you push code.
You can skip this and set it up later in [Settings](/platform/settings), but deployments won't be automatic until it's installed.
## Clone and install
Clone the repository Gumstack created and install dependencies.
```bash theme={"dark"}
git clone https://github.com/your-org/your-server.git
cd your-server
```
We recommend [uv](https://docs.astral.sh/uv/) for fast, reliable Python package management.
```bash theme={"dark"}
uv sync
```
Using pip with a virtual environment:
```bash theme={"dark"}
python -m venv .venv
source .venv/bin/activate # On Windows: .venv\Scripts\activate
pip install -e .
```
## Add your first tool
Tools are the functions your MCP server exposes to AI assistants. Each tool has a name, description, and logic that the AI can invoke.
Edit `src/server.py`:
```python theme={"dark"}
from mcp.server.fastmcp import FastMCP
from pydantic import BaseModel
mcp = FastMCP("my-server")
class GreetingResponse(BaseModel):
message: str
@mcp.tool()
def greet(name: str) -> GreetingResponse:
"""Say hello to someone."""
return GreetingResponse(message=f"Hello, {name}!")
```
Register your tool in `config.yaml` so Gumstack knows to expose it:
```yaml theme={"dark"}
tools:
- name: "greet"
description: "Say hello to someone"
```
Every tool needs both a Python function **and** a `config.yaml` entry. Without the config entry, Gumstack won't detect the tool. See [Tools](/building/tools) for best practices.
## Deploy
Push your code to trigger an automatic deployment:
```bash theme={"dark"}
git add .
git commit -m "Add greet tool"
git push
```
Gumstack watches your repository and automatically builds and deploys your server whenever you push to `main`. You can monitor the deployment from the **Deployments** tab on your server's detail page.
Your server is live! You can find its URL on the server's **Overview** tab in [Internal MCPs](/platform/internal-servers).
## What's next?
Understand your server's file layout
Learn tool best practices and patterns
Implement OAuth, credentials, or env vars
Connect your server to Gumloop workflows